Values in International Vocational Education – Online Courses – DIVE
Values in International Vocational Education
Welcome to the course "Values in International Vocational Education", which is part of the project Digital Internationalisation in Vocational Education (DIVE) exploring three overarching themes
- democracy and citizenship in international VET,
- sustainable development in international VET, and
- values in international VET.
This course about values is developed by Karlstad University, Sweden.
Introduction to the subject
Introduction lecture
Introduction lecture
Discuss
Discuss
After watching the introduction lecture, we suggest you discuss the following questions in your group – or in a larger group if you prefer:
- Do you have a special word in your country for the values?
- What values are important for you as a teacher in your VET context? Are these values the same as your country’s curricula values?
- Are there values that are important for the student’s future professions that you emphasize? Why do you emphasize them?
- Are there different values in different trades? Why does your trade have these values and why can it differ?
- Which perspectives are important in your country? In Sweden, these perspectives are ethical, environmental, international and historical, and the perspectives are important for education in each subject. Discuss how these perspectives could be relevant for vocational education in your country.
- What value problems do you face in your country? In schools, workplaces and society?
- Can your students choose university education after their VET? Do you think that it is important for the VET students to be able to go to university?
Further reading
Scientific articles
Scientific articles
Asghari, H. (2014). Från uppväxt till lärargärning: En livsberättelsestudie med åtta yrkeslärare på industritekniska programmet [From growing up to the teacher act: A life story study with eight vocational teachers in the industrial-technology programme] (PDF). Doctoral dissertation, Karlstad University Studies. (English summary in Chapter 8, 188–216)
Asghari, H. & Johansson, M. C. (2021). The students who chose industry in Sweden: The attractiveness of industrial technology education [Manuscript submitted for publication].
Asghari, H. & Schaffar, B. (2019). The human right to work: The tension between intrinsic and instrumental values in five teachers’ stories from the industrial technology programme. Nordic Journal of Vocational Education and Training 9(2), 71–90.
Davenport, C. & Armstrong, D. (2004). Democracy and the Violation of Human Rights: A Statistical Analysis from 1976 to 1996. American Journal of Political Science 48(3), 538–554.
Hamilton, A., Rubin, D., Tarrant, M. & Gleason, M. (2019). Digital Storytelling as a Tool for Fostering Reflection. Frontiers: The Interdisciplinary Journal of Study Abroad, 31(1), 59–73.
Isacsson, A., Amhag, L., & Stigmar, M. (2018). The content, challenges and values that form Nordic Vocational Teacher Education. Ammattikasvatuksen aikakauskirja, 20(2), 38–50.
Ray, S. & Zaretsky, J. (2021). Gender in vocational education and training: An integrative review. European Journal of Training and Development. Advance online publication.
Zyngier, D. (2011). Rethinking the thinking on democracy in education: What are educators thinking (and doing) about democracy? Education Sciences, 2(1), 1-21.
Statutes, treaties and international conventions
Statutes, treaties and international conventions
SFS 2008:567. Swedish Discrimination Act.
United Nations Universal Declarations of Human Rights, 10 December 1948 (Available in several languages).
United Nations Transforming our world: the 2030 Agenda for Sustainable Development, 21 October, 2015 (Available in several languages).
Links to school related information
Links to school related information
Curricula
Curriculum for the upper secondary school, Sweden.
Subject plan Industrial Technological processes, Sweden (Example from the lecture).
Core Curriculum for primary and secondary school, Norway.
Summary Values Education Germany (PDF)
Information about the Swedish school system
Swedish National Agency for Education.
Swedish vocational education and training.
Information about the Norwegian school system
The education system in Norway.
Norwegian vocational education and training.
Information about the German school system
The education system in Germany
German vocational education and training.
Information about the Turkish school system
Inspiring examples from course work
Inspiring examples from course work
Here are some examples from how we have been working with values in vocational teacher training at Karlstad University. These are student works based on an assignment in our first course in the teacher education.
This is the assignment
Here are two examples
Preparing a story
What is digital story telling?
What is digital story telling?
Digital Storytelling is the art of combining a narrative (in the form of a written script which is recorded) with various digital media, normally in the form of pictures and sound (but it could also be with video clips). The use of digital storytelling as a method and for different purposes can be observed in several disciplines such as a research method (De Jager, Fogarty, Tewson, Lenette, & Boydell, 2017), health work (Jamissen & Skou, 2010), settlement (Lenette, Brough, Schweitzer, Correa-Velez, Murray, & Vromans, 2019), and community leadership (Brushwood Rose, 2019). In education, digital storytelling can engage pupils in both traditional and new ways of telling stories and has also proven to be a positive and constructive way for struggling pupils to "tell" and “write” stories (Lambert, 2018; Miller, 2014; Ohler, 2013; Wu & Chen, 2020). Digital storytelling has also proven to be a way of developing professional digital competence (PDC) in future and current teachers who in turn must stand out as a good digitally competent role model for their pupils (Røkenes, 2016). The video below sums up the main elements in digital storytelling.
A digital story is normally 2-3 minutes long where the narrator deals with/reflects on a critical incident and is usually based on a written script of around 150 – 300 words (Røkenes, 2016). The number of pictures needed depends on the rhythm and the pacing of the story, but between 6-12 pictures should be enough. However, depending on the purpose of the story (to describe and/or to reflect on an incident, experience, story, artifact, and so on), the digital story can vary in length and number of pictures. Moreover, digital storytelling differs from a randomly composed slideshow with music and photos in the sense that a digital story is often linked to a task with specific requirements such as focus, choice of theme, and assessment (Normann, 2012a).
In a well-composed digital story, all elements must be carefully chosen, with respect to if and how they should be part of the story. This means that the producer of a digital story should not focus on using the various digital media simply as a form of decoration or “wrapping” of the story presented. Instead, he or she should always question (or reflect upon) whether pictures, sound, animations, transitions, and the editing (i.e. choice of font, color, and animations) of the text slides used (i.e. slides mainly used in the beginning and at the end of a digital story) support, emphasize, expand or contrast the overall message of the story. Consequently, introducing the digital storytelling method in a classroom might take up a significant amount of time, and is usually organized as a long-lasting project, workshop, part of a summer school or an after-school enrichment program (Wu & Chen, 2020).
Joe Lambert (2018) at the Center for Digital Storytelling in California has come up with seven steps or elements to think about in order to create a personal narrative in the form of a digital story. During the writing process, he tells us to think about the following aspects: 1) point of view; 2) a dramatic question; 3) emotional content, and 4) economy. During the creation/editing process, we should consider the importance of 5) pacing, 6) the gift of our voice and 7) a soundtrack. For more information, check out the website hosted by The University of Houston, TX.
The digital story telling process
The digital story telling process
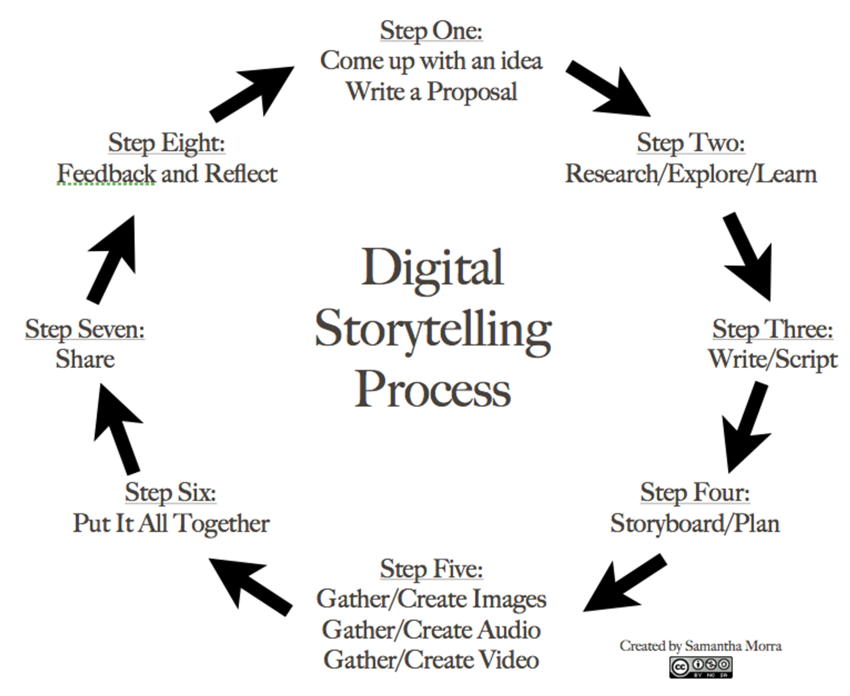
As illustrated in the image below, the work process with digital storytelling usually involves eight steps:
- Coming up with an idea or "finding the story"
- Researching and exploring the topic of the idea
- Creating a manuscript or "writing the story"
- Planning the story using a storyboard or a timeline
- Searching for and gathering relevant photos, images, illustrations, videos, music, sounds including recording the narration
- Composing the different elements of the story in a video editing software
- Exporting, publishing and sharing the story on a video platform (YouTube, Vimeo), a local platform or LMS (learning management system)
- Assessing and providing feedback on the digital stories
1. Coming up with an idea or "finding the story"
In order to "find the story", pupils will usually have to work on a subject-specific task that is provided by the teacher (for example, make a story about an important event during your apprenticeship/work placement). Having pupils practice free-writing (write non-stop about a topic for one minute) or use mind mapping tools (e.g. Mindmeister, Coogle) can be relevant to generate ideas.
2. Researching and exploring the topic of the idea
Once the pupils have come up with an idea for their stories, they should test their ideas by discussing them with their peers and the teacher. First, pupils could work in pair, then in groups of four and finally, the teacher could ask the groups to share their ideas in plenary or write their ideas down on a large piece of paper that is hung up in the classroom or on a digital board (e.g. Padlet, Flinga).
3. Creating a manuscript or "writing the story"
After having their ideas for their stories tested and approved, the pupils should focus on writing a first draft of the manuscript to the story. Here, the teacher can set limits on how many words the text should be depending on the level of the pupils and also open up for differentiation. Drafts could be shared and commented on by peers and/or the teacher where the pupils revise their texts and create new drafts.
4. Planning the story using a storyboard or a timeline
At the next stage, pupils will usually be busy trying to find images that fit with their stories. However, pupils have a tendency to focus on superficial aspects of their stories and waste a lot of time trying to find the "right" pictures. Therefore, a useful non-digital tool for working with the manuscript and the content of the story is to use a storyboard ("Dreiebok" is a more commonly used term in Norwegian).
Students have to plan their stories by filling in the matrices on paper (before working with their computers or mobile devices). That way, they get a clearer perspective of what their stories are about, who is involved, how their stories are built up, how they progress and what are the main points or messages of their stories.
5. Searching for and gathering relevant photos, images, illustrations, videos, music, sounds including recording the narration
Pupils usually master the stage of finding photos, music, and recording narration either using their laptops or mobile devices. However, having the pupils find pictures that fit their stories opens up for the teacher to differentiate and create interesting topics of discussion; Can photos and music be downloaded freely from a Google search? What about copyright? Where can media be downloaded freely? How does Creative Commons work? Here, the teacher can provide the pupils with media resources where they can find freely available images, photos, and music such as Pixabay, Unsplash, and Premium beat.
6. Composing the different elements of the story in a video editing software
When putting the digital story together, pupils should try to use software that they are comfortable with and available to them such as the ones listed on the suggested software page of this VOOC. Usually, there will be a technical expert in the classroom who can provide assistance to their peers or the teacher can direct the pupils to online tutorials on for example YouTube or Vimeo.
7. Exporting, publishing and sharing the story on a video platform (YouTube, Vimeo), a local platform or LMS (learning management system)
Once the pupils are finished their digital stories, finding a place where the stories can be shared will be important. Here, the teacher needs to take into account that not all pupils will feel comfortable with sharing their stories and so should open up for alternatives (closed submission folder on local LMS vs unlisted video link on YouTube/Vimeo).
Digital Story Telling Tools with Rushton Hurley
Digital Story Telling Tools with Rushton Hurley
Digital Story Telling Tools with Rushton Hurley (YouTube video)
You can also find help in this Youtube-video (379) [AFCC] Digital Storytelling Tools with Rushton Hurley. (Start at 19 min and watch to 29 min). Become inspired!
Creating your digital story
Specific requirements
Specific requirements
- The storyline should build upon the DIVE-theme questions.
- Duration: 3–6 minutes
- English language should be used for any voiceovers or subtitles. It is additionally possible to add subtitles in your own language or create a second version of the film in your language(s).
- Acknowledgement: on the first and last visible slide/page/other, please add the PPT template showing the EU-flag, DIVE-logo and the following text: “This story has been made with the support of the Erasmus+ programme of the European Union to the KA2 strategic partnership project DIVE. It reflects only the views of the authors, and the European Commission cannot be held responsible for any use which may be made of the information contained therein
Relevant software for story telling
Relevant software for story telling
Software for recording and editing digital stories
There are various video editing and recording tools (software) that can be used when making digital stories (Ohler, 2013). The most common ones are:
- Adobe Spark (runs in web-browser, free)
- Microsoft Sway (Windows, MAC OSX, free, requires Microsoft Office 365)
- OpenShot video editor (Windows, MAC OSX, Linux, free/open-source)
- Shotcut (Windows, MAC OSX, Linux, free/open-source)
- Screencast-O-Matic (Windows, MAC OSX, free, can also run in web-browser)
- iMovie (MAC OSX, preinstalled on MAC)
- Microsoft Teams/Stream (Windows, MAC OSX, requires Microsoft Office 365)
You might ask yourself; what tool should I use? There are just so many to choose from! Most of the tools listed above have a similar structure, logic, and interface. However, Adobe Sway is highly recommended because it can be run directly through your web browser and it does not require you or your students to download and install any software on your local device. Another alternative is creating a slide show with photos for your digital story in for example PowerPoint and then recording the video with narration using Screencast-O-Matic.
Most students today are familiar with video editing and video recording tools on their mobile devices (smartphones, tablets, laptops). However, this might not always be the case with teachers. Therefore, when installing or running one of the tools mentioned above, a good place to start looking for guides, tutorials, and demonstration videos is YouTube. In the search field on YouTube, try searching for the name of the program and guide or tutorial or demonstration (for instance, how to use Adobe Spark Video or Screencast-O-Matic tutorial).
Adding subtitles
Adding subtitles
There are many different tools to use, and different ways of adding subtitles to your video (aka digital story). You can easily fins manuals for specific softwares through searching on the net. As a student, maybe your university/school can provide you with software for adding subtitles and caption. If you don't ask, you will never know 😉.
For those of you working directly in Youtube, here is a video describing how to do.
When the story is finalised
Educational purposes of digital story telling
Educational purposes of digital story telling
Language learning and digital storytelling
Working with digital storytelling in an ESL/EFL or any other language class for that matter, in vocational studies or other subject disciplines can easily be aligned with several competence aims/goals in your national curriculum and can be expressed in the form of various, specific learning objectives/outcomes. Digital storytelling is a method or working process that lends itself easily to combining the development of language skills as outlined in the Common European Framework of References for Languages including reading, writing, listening oral production and oral interaction (Council of Europe, 2018) and basic skills as outlined in the Norwegian National Curriculum for Knowledge Promotion including reading, writing, oral skills, numeracy, and digital skills (Norwegian Directorate for Education and Training, 2020). On the one hand, students can work with specific content areas (e.g. literature, items and tools, work practice placement) and on the other hand practice various skills (language and basic).
Below are examples of digital stories created by students, pre-service teachers, and former vocational education student teachers taking this VOOC. A common feature that you might notice in several of the examples is that there is an emphasis by the narrators on description and describing events/artifacts rather than reflection and reflecting on how these events/artifacts play a role in one's education or affect how you are feeling. Again, digital stories are supposed to primarily focus on the narrator's reflection tied to the focus of the story and so keep this in mind when developing your own stories.
Literature and digital storytelling
When working with literature, digital storytelling can be used by the teacher, either as a way of introducing a literary text or as a way to spur the pupils’ interest and curiosity for the text to be studied. The most exciting way of using it, however, is to allow pupils to be creative and develop their own digital stories related to the text studied. This can e.g. be in the form of a personal, digital story, like in the example, I Love Matilda, made by an 8th grader some years ago. The girl, Julie, did not want to talk English out loud in class, but gradually got to practice her orals skills through making DSTs to the point where she was able to hold a presentation in English in front of the class (Normann, 2012b). The task here was to make a digital story related to a good book the pupils had been reading themselves, or a book that had been read aloud to them by their parents.
Another digital storytelling task related to reading literature was done in a web-based further education course on "Literature and Culture in the Classroom" for English as a Second Language (ESL) teachers in the Norwegian secondary school. The group of teachers were working with different young adult fiction novels such as John Boyne’s (2006) famous novel The Boy in the Striped Pyjamas. After having studied and worked on the novel for some weeks the teachers were asked to finalize the project by making a digital story. The specific task was to EITHER choose one of the characters in the novel and to present a story as this character could have told it OR tell a story from one's own perspective about the reading experience with a focus on the emotional/aesthetic dimension. The story had to be based on something that actually took place in the book so that the peers in the course could recognize the story when they watched the actual interpretation in the form of a digital story.
Vocational education and digital storytelling
For vocational studies, digital storytelling is a highly relevant way of showing knowledge about a specific content area such as tools, working methods, and telling stories about relevant experiences during the work placement as a part of the apprenticeship.
Here are examples of digital stories created by former VOOC participants. The first example is from a Child and Youth Worker. Pay attention to how the participant manages to strike an impact (skape et anslag) on the viewer within the first 30 seconds of the digital story.
The next example is from a participant who reflects on his observations from his work placement at a lower-secondary school. The video consists of sections that have been cropped together.
Finally, the last example is from a participant who, towards the end of his digital story reflects on negative and positive aspects related to the future of the workplace in times of Corona.
Sharing your story
Sharing your story
There are different ways in which you can share your story to others. Publishing it online (in a cloud) makes it easily accessible to others, whether you want it to be public or shared with a limited group of people. Your university or school may have servers where you can upload videos, but many students use for example YouTube. or Vimeo.
There are limited possibilities to upload your videos in the assignment module here. If the file is not too heavy, you can try. We will be happy to share some of your contributions to other students, only with your permission of course.